- MN ABE Connect
- Archive
- Using Google Slides to Make Flashcards
 November 17, 2025
Using Google Slides to Make Flashcards
To recap this differentiation routine:
What is this routine? At its core: making flashcards using Google Slides.
 Why does it work so well? This activity is very accommodating for different DL levels.
Using Google Slides to help students develop their digital literacy skills offers a goldmine in terms of differentiation options.
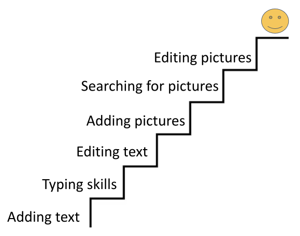
The breadth of skills you can cover using Google Slides is super vast! It’s a goldmine for easy differentiation in developing digital skills. In the webinar, I discussed developing a progression of skills that you’d like students to develop. For Azul’s intermediate class, this looked something like the image on the right.
How does it work? Well, there is kind of a lot of upfront investment in this, but on a usual week, I’m able to have everything set up in about 15 minutes!
What do I need to do this activity?
- A classroom website (or a spot for students to easily find the activity): You can use whatever LMS or website maker you’d like for this. I used Canva to make mine since it’s so quick and easy. If you’re interested in learning how to do the same, take a look at my Canva presentation where I go over how I did this here.
- Access to Google Drive: This could be a challenge! At my site, all of the laptops for students are logged into the same Google account which makes it very easy for students to access this activity. If students are using their own devices/logging into their own Google accounts, this could take a lot more time.
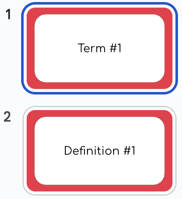
- Flashcard template: You can view my template here! You’ll see that they are separated by color (2 slides of each). Having 2 slides of a color is important, don’t skip it!
- A set of vocabulary words/content suitable for flash cards (bonus points if it’s on a physical worksheet!): This is up to you! In Azul’s intermediate class, students usually have a worksheet where they match vocabulary words to their meanings, and then they use that to make their flashcards. It’s much easier to practice typing with things that are already written out and familiar.
- Patience!!: Digital skills are difficult to develop, and students are often coming in with very different levels of experiences with technology. Encourage patience with them and yourself as you navigate incorporating digital literacy activities into your class 🙂
How do you prep for this activity?
In my own drive:
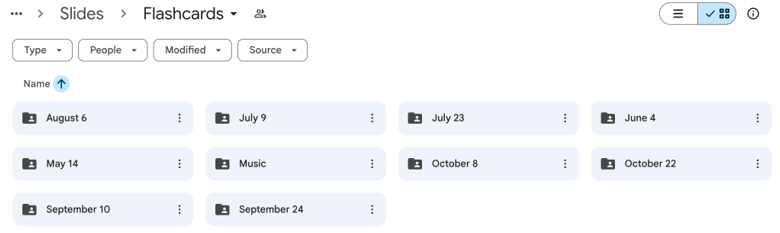
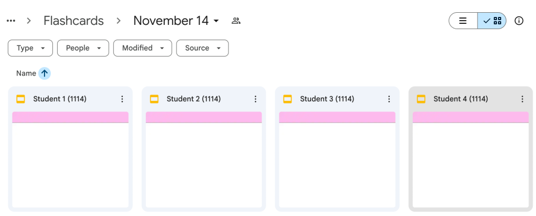
Each time we make flashcards, I make a copy of the flashcard template for each student. I usually title them “Studentname (Date).” These are shared with students in a PUBLIC google drive folder. The folder needs to allow everyone editing access, or else the activity won’t work. Once every student has a copy, I will get the shareable link to the FOLDER and copy it. The view below is what the set-up should look like in your drive, an example of what students should see is available further into the article.
On my Canva website:
For digital activities, I use a class website to help students find things quickly. You can see an example of what my website looks like on the right. I will edit my website in Canva to include the link to the flashcard folder for the day, and then I’m set! Adding links to the website is super easy; if you know how to hyperlink, you can do it.
What does this look like in your class?
Getting computers:
At our site, there are sets of computers in each classroom. This makes it much easier for students to get in the routine of grabbing computers quickly/efficiently!
Logging into the computers:
At Open Door, we have a universal password for all of the computers that students use. This makes it easier for everyone to get onto any device at our learning center. If your students are using their own devices and/or have to log into their own Google accounts, this may take longer. Remember, go slow to go fast. If you invest time up front to practice this skill with students, they will get better and better at it!
Reaching the website:
Like mentioned before, at my site, all of the computers are logged into the same Google account, and my webpage is bookmarked on each device! I would highly suggest creating a bookmark if you’re interested in doing this regularly. If you want to have students type in a web address, I suggest using a URL shortener (like TinyURL) to make this easier.
Accessing the flashcard template:
Since the link to the shareable (and editable) folder with student templates should be shared on the website, students can click on the link to access the folder! Once they are in the Google folder, they can find the template with their name and begin working on typing their flashcards.
 Typing on the flashcards:
The way the flashcards in my template are set up, all students need to do to start writing is click into the white box and start typing! I’ve set it up so that the font size and style are legible. Ours look something like this:
What are your students focusing on?
Beginning digital skills:
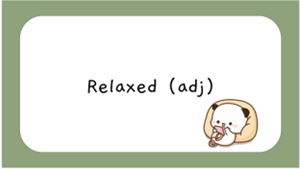
Typing and becoming familiar with the keyboard. It’s great if they can incorporate correct spelling into this, or even type all of the vocabulary words/meanings, but words on the slides was the most important goal for us! In the progression chart from above, we would mostly be focusing on adding text and typing skills. Flashcards might look something like this:
Intermediate digital skills:
At this point, many of the students are familiar with adding text and have developed proficient typing skills.
 If they’re able to complete typing all of their vocabulary during class, this is a sign to start moving towards more difficult skills (in the progression, we’re at editing text and adding pictures).
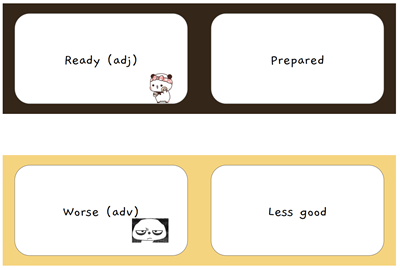
Here, we encourage students to use Google’s editing/spelling suggestions and even change the font color/size. If they can do this, we encourage them to insert pictures to help them remember the vocabulary terms. We use the images in Google slides by going to “Insert → Image → Stock and Web”. From here, students are able to search for what they want to add to their cards. Flashcards often end up looking like the example on the right.
Advanced digital skills:
When students are able to adequately edit text and add photos, we can move into the more advanced skills in the progression: searching for pictures (NOT in Google slides) and editing images (mostly cropping and resizing). These activities help students refine their existing computer skills such as using keyboard shortcuts, using right clicks, and clicking and dragging.
The flashcards are done, now what?
 For the most part, we usually print out the deck of flashcards for the students. If you print the slides 4 to a page, they are able to be trimmed and folded into flashcards.
At my site, we had a bunch of book rings lying around, so we hole-punched the flashcards and put them on rings for students, but they’d be perfectly fine just folded (or even looped on a paper clip)! When you’re printing, it should look something like the picture on the right. This is why color-coding the slides in pairs is important! It helps to distinguish each card when printing. Just a reminder, if students make a mistake in the order of the flashcards, it may not print correctly.
Although the tutorial/guide above looks intimidating, I promise it’s not as bad as it looks. If you’re confident in your own Google suite skills, you’ve already fought half of the battle!
The time investment upfront seems heavy, but it gets easier and easier as you go along. This activity used to take a full hour to complete with Azul’s intermediate class, and now some students are finished within half an hour. Remember, we’re going slow to go fast! You (and your class) can do it!