- MN ABE Connect
- Archive
- Using Zoom for Teaching or Meeting Virtually? Secure Your Sessions with These Simple Steps
 April 6, 2020
Using Zoom for Teaching or Meeting Virtually? Secure Your Sessions with These Simple Steps
Do you feel like you’re scrambling to navigate new online tools as the necessity to move to virtual communication has turned “business as usual” on its head? Are you worried about recent security concerns with various online meeting platforms such as Zoom? Since I know a lot of us are using Zoom right now, I would like to pass along some calming advice from tech-savvy colleagues so you can shore up the security of your online meetings and free up that head space for the more important things – like taking care of yourself and maintaining those critical lines of communication with your students.
Only YOU can prevent Zoombombing
In any crisis, there are always bad actors who attempt to exploit the situation. Such is the case with “Zoombombing” – a form of online trolling in which someone gains unwanted access to a Zoom meeting or class and uses screensharing and other tools to disrupt it.
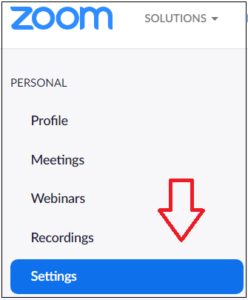 But fortunately, as the Zoom meeting host, you have an arsenal of tools available to you to lock down your meeting and prevent this from happening – and many have been switched to default settings so it’s even easier for you. Here are several settings (found in your account’s Settings tab or in the Host tools during a meeting) and best practices to use as a Zoom meeting host:
- Do not post your Zoom meeting ID or URL in public places. Don’t share this information on social media or other public forums, and also consider adding a note to your email invitation asking your participants to follow suit. In addition, use the default meeting ID generated automatically by Zoom; it is randomized and much harder to hack.
- NOTE: If you put a meeting on a shared online calendar, anyone who has access to that can simply copy the information and enter the meeting. This may or may not be an issue for you.
- Use the Require a password features. There are several settings that involve passwords, and as of April 4, Zoom has turned on these password requirements by default. You’ll be fine as long as you don’t turn them off!
- EXCEPTION: For added security, you can disable the Embed password in meeting link for one-click join setting. That way, absolutely everyone must provide a password to access your meeting, regardless of whether they’re joining by phone or computer. (If you leave this setting enabled, those joining by computer won’t have to type in a password.)
- UPDATE (4/17/20): However, if you are requiring registration for your meeting, do enable the Embed password in meeting link for one-click join setting; this is because each registration confirmation email will contain a unique password that cannot be shared or used by someone else.
- Use the Waiting Room feature. This critical functionality gives the host direct control over who joins the meeting. You can “allow” participants individually as they attempt to join, or admit everyone all at once. As of April 4, Zoom has turned on the Waiting Room by default, so your only job is to not disable it!
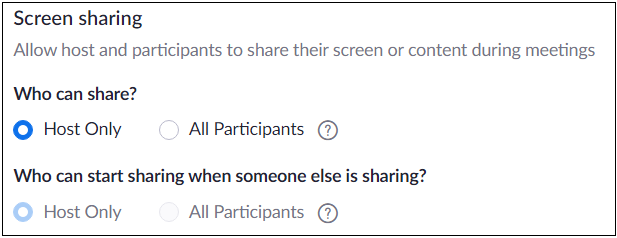 Set your screen sharing to Host only. This will prevent anyone else from taking control of what participants see. Note: you can always change this setting if you change your mind during the meeting. You can also disable the Whiteboard so that no one can start drawing random things during the meeting.
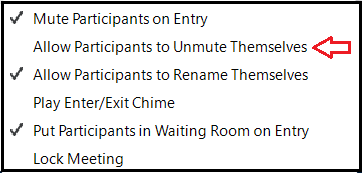
- Mute participants upon entry. This is good practice anyway, especially for meetings involving many people. While in the meeting, you can also disable Allow Participants to Unmute Themselves; this gives you complete control over who is allowed to speak. You do this by clicking on Manage Participants (to the left of the green Share Screen button shown below), clicking on the down-arrow that appears next to More on the right…
![]()
… and unchecking Allow Participants to Unmute Themselves from the dropdown list:
Additional settings to consider
There are a few additional ways you can secure your Zoom meetings, but it’s a give-and-take regarding which features are important for you to access in your particular situation.
- Disable File transfer. No one will be able to post documents in the Chat box – which makes your meeting more secure, but this may be a feature that you wish to use.
- Lock the meeting. Once you’re certain everyone you invited has joined, you can lock your meeting to prevent anyone else from joining. You do this by clicking on Manage Participants, clicking on the down-arrow that appears next to More on the right, and choosing Lock Meeting from the dropdown list. However, bear in mind that this may cause problems if someone loses their connection for any reason and wants to get back in.
Participating in a Zoom session more securely
Many IT departments are recommending that you avoid downloading the Zoom application onto your computer/device until the company can address all potential vulnerabilities. So, when entering a Zoom meeting, choose to use the browser version instead.
Final security considerations – data privacy and K-12
As you may be aware, many IT departments are warning K-12 schools not to use Zoom, and it bears pointing out here that there is good reason for this. As explained by Susan Wetenkamp-Brandt, the Senior Manager for Educational Technology & Digital Literacy at Literacy Minnesota, “Those security concerns have much more to do with data privacy, especially regarding children under age 13. From what I can tell, any version of Zoom except for the ‘Edu’ version is probably not compliant with COPPA (The Children’s Online Privacy Protection Act). The free and ‘Pro’ versions of Zoom were made for use in business and may not comply with COPPA’s rules about collecting and sharing data.”
Use available security features – and be patient with yourself
So, the bottom line when using Zoom or any other online meeting platform (for non-K12 settings) is to use the security features available to you – especially passwords and Waiting Rooms (if available). With Zoom, thankfully many of those important security settings have now been enabled as defaults, making it much easier for you to safely conduct your online meetings with confidence.
 If you are using a different online platform, one trick is to Google the platform name and add the word “vulnerability” to discover the potential issues you may encounter. Most platforms are probably now taking a look at their security features, given the current boom in online conferencing usage. And keep in mind that even those of us who never considered ourselves terribly “techie” do have a reserve of problem-solving skills that can serve us very well in this new virtual world, if we actually give ourselves permission and time to learn. Be patient with yourself as you’re learning new technologies! And always reach out for help and advice when you need it; there is no shame in not knowing how to do something new.
Get support and stay connected through the COVID-19 Schoology group!
A great way to get that support, stay connected with colleagues, and access helpful resources is through the COVID-19 & Distance Education Schoology group. If you have not yet joined this dynamic online community, below are the instructions for getting on board. Please join us!
Contact the DL team for questions about distance learning
Are you a Minnesota Adult Education practitioner with questions about anything specifically related to distance learning (DL) in the age of COVID? Literacy Minnesota’s DL staff and consultants are available and eager to help you! Find information on their DL website, http://mnabe-distancelearning.org/, or email them directly at [email protected].
How to Join the Schoology Group
If you already have a Schoology account:
- Log into your account
- Click on the “Groups” tab at the top of the page
- Click “My Groups” on the upper right side
- Click on “Join Group”
- Enter the access code 4PQM-9XNK-FRF7X
If you do not have a Schoology account:
- Go to https://www.schoology.com/
- Scroll to SIGN UP at the top right and sign up as an Instructor
- Once you’ve registered, click on the “Groups” tab
- Click “My Groups”
- Click on “Join Group”
- Enter the access code 4PQM-9XNK-FRF7X
Important Follow-up Below:
 Once you have joined
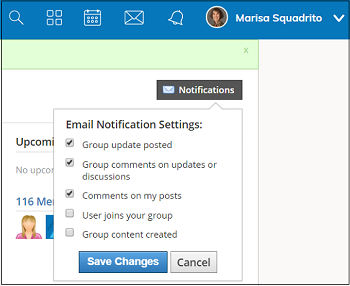
- Click on Notifications in the upper right corner
- Set your email notifications by checking the appropriate boxes to make sure you find out when updates to the group are posted and when people comment on your posts
- Browse the Discussions tab for facilitated discussions, as well as Updates and Resources
- Post new comments, questions, or information to the above